


Introduction
The data model is one of the cornerstones of any enterprise application. When you start planning the model, you should not only take into account business data requirements but also answer some additional questions that may affect your application design. For example: do you need row-based security? Are you going to use soft delete? Do we need CRUD API, and who will do this boring job?
JPA is a de-facto standard for creating a data model for Java applications. This API does not provide facilities to implement advanced security or soft delete, so developers have to implement their own solutions.
Jmix framework provides a generic engine that adds extra features to applications that use JPA. The framework allows you to enjoy advanced data security, use soft delete transparently, provides generic REST API for CRUD operations and some other features without breaking JPA compatibility.
In this article, we will discuss the data access layer in Jmix, talk about what can be done with this framework and its tools, and how the data access works under the hood.
Data Model, JPA, and @JmixEntity
As a java developer who is familiar with JPA, you don’t need to learn anything new to start working with Jmix. You simply create JPA entities. Jmix provides a GUI designer that assists you with this task.
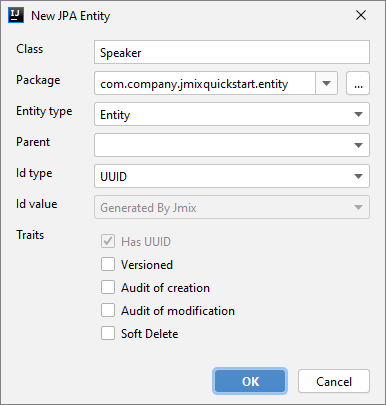
In the designer, you need to give your entity a name, select the ID type (UUID, Long, Integer, String, or embedded class), and select the features to be supported:
- Versioned - to support optimistic locks
- Audit of creation
- Audit of modification
- Soft Delete
As a result, you will get a JPA class similar to this:
@JmixEntity
@Table(name = "SPEAKER")
@Entity(name = "Speaker")
public class Speaker {

@JmixGeneratedValue
@Column(name = "ID", nullable = false)
@Id
  private UUID id;

@Email
@Column(name = "EMAIL", unique = true)
   private String email;

@Column(name = "NAME", nullable = false)
@NotNull
   private String name;

@Column(name = "VERSION", nullable = false)
@Version
   private Integer version;

@CreatedBy
@Column(name = "CREATED_BY")
   private String createdBy;

@LastModifiedBy
@Column(name = "LAST_MODIFIED_BY")
   private String lastModifiedBy;

@DeletedDate
@Column(name = "DELETED_DATE")
@Temporal(TemporalType.TIMESTAMP)
   private Date deletedDate;

   //Some columns, getters and setters are omitted
}
Please note that Jmix is not invasive. The entity does not implement even a single framework-specific interface not to mention inheriting a class, just adds some extra annotations. This gives you great flexibility in creating your own application-specific entity hierarchies that fully meet your business requirements.
Most of the annotations used by Jmix are either from JPA or from Spring Boot JPA libraries: @Entity, @Versioned, @CreatedBy, @LastModifiedBy - you could have seen them before. The framework relies on the Spring Boot implementation to support optimistic locking, as well as creation and update audit.
Let me bring your attention to some Jmix-specific annotations that you will see in your data model:
@JmixEntity- instructs Jmix data access layer to add this class to entities repository@JmixGeneratedValue- indicates that the entity’sIDattribute value must be generated and assigned by Jmix@DeletedByand@DeletedDate- used to mark fields that indicate that the entity was deleted when you use the soft delete approach
You may ask: “What is an entity repository in Jmix’s data access layer? Do you have your own data access engine?” Yes and no. The framework stores extra information about the application’s data model - metamodel, and adds a special facility - DataManager - for data access, but still uses standard JPA under the hood.
Metamodel and DataManager
Jmix is based on the Spring Boot framework. The latter is known for its extensive usage of the IoC pattern that implies storing all data about beans in the special repository - ApplicationContext. In addition to this, Jmix stores all data about your application data model (e.g. metadata) in another repository - Metadata.
Metadata is the heart of the data access layer in Jmix. It contains all the information about entities, attributes, entity associations, etc. This information is collected once at the boot time during class scanning and used by Jmix to do its magic: from row-based security to two-way data binding in the generated admin UI.
To utilize the Jmix data access layer efficiently, you need to use the DataManager component. It is a wrapper for the well-known EntityManager from JPA. Similar to EntityManager, DataManager can load entities using JPQL query or ID, save or delete entities as well as count selected instances.
Here are the examples of DataManager usage.
Load one instance by ID using java class as a parameter:
Speaker loadSpeakerById(UUID speakerId) {
    return dataManager.load(Speaker.class)
            .id(customerId)
            .one();
}
Load data using JPQL query string:
List<Speaker> loadSpeakesByCompanyEmail() {
    return dataManager.load(Speaker.class)
            .query("select s from Speaker s where s.email like :email")
            .parameter("email", "%@company.com")
            .list();
}
DataManager uses Metamodel to provide some extra features by intercepting and modifying requests to the application database before passing them to EntityManager for execution.
Let’s have a closer look at the features that Jmix provides.
Advanced Data Security
The first thing that should be mentioned - the Jmix data security subsystem. The framework uses role-based security and defines two types of roles:
- Resource role - gives users permissions to access objects and perform specific operations in the system: CRUD operations over entities, entity attributes, UI screens, and so on.
- Row-level role - allows you to restrict access to particular rows of data, in other words - to entity instances.
For the resource role, you can define policies for entity CRUD operations and even operations allowed for entity’s attributes.
@ResourceRole(name = "Speaker Admin", code = "speaker-admin-role")
public interface SpeakerAdminRole {

   @EntityPolicy(entityName = "Speaker",
                 actions = {EntityPolicyAction.ALL})
   @EntityAttributePolicy(entityName = "Speaker",
                          attributes = "{name, email}",
                          action = EntityAttributePolicyAction.MODIFY)
   void speakersAccess();
}
To implement this, DataManager analyzes JPQL and either restricts its execution or modifies the attributes list to comply with security policies.
To define a row-level role you should specify a JPQL policy that consists of the where and optional join clauses that restrict data selected from the DB table.
@RowLevelRole(name = "Speaker's Talks",
             code = "speakers-talks-role")
public interface SpeakersTalksRole {

   @JpqlRowLevelPolicy(entityClass = Talk.class,
                       where = "{E}.speaker.id = :current_user_id")
   void accessibleTalks();

}
So, all queries that are issued by a user with a row-level role are transformed in the following way: the where clause is appended to the existing clause using AND operator, and the join condition is appended to the existing one. If either of them does not exist in the JPQL, the corresponding clause is “just” appended.
Metadata repository plays an important role here. It helps us to parse and modify JPQL correctly and find restricted attributes and entities whenever string JPQL or a Java class is used to define a DB query.
Soft Delete
In some cases, soft delete is required for enterprise applications. The pros and cons of the soft delete pattern were discussed in the article “To Delete or to Soft Delete, That is the Question!” in the CUBA Platform blog. Jmix is a descendant of CUBA, so soft delete is supported in this framework, too.
Soft Delete mode is enabled automatically for entities with the fields annotated with @DeletedBy and @DeletedDate. For these entities, all remove() invocations in the DataManager are intercepted and transformed to UPDATE statements, and all find() requests will be modified with an appropriate where clause to exclude the “deleted” entities.
@JmixEntity
@Table(name = "SPEAKER")
@Entity(name = "Speaker")
public class Speaker {

   @JmixGeneratedValue
   @Column(name = "ID", nullable = false)
   @Id
   private UUID id;

   @DeletedBy
   @Column(name = "DELETED_BY")
   private String deletedBy;

   @DeletedDate
   @Column(name = "DELETED_DATE")
   @Temporal(TemporalType.TIMESTAMP)
   private Date deletedDate;

      //Some fields are omitted
}
We need Metadata here to find out which database column should be updated or added to where clause. In contrast to CUBA, Jmix does not require an entity to implement a specific interface to support soft delete. All you need to do is just to add two annotations to the entity’s fields.
Note that you still can perform “hard delete” and see the “deleted” entities using JPA EntityManager and native SQL.
REST and GraphQL
Automatic CRUD API creation is the area where Jmix’s metamodel shines. When you have all the information about entities in your application, it is pretty easy to create an API for manipulation.
For example, it should not be hard to handle HTTP requests like this if you have metadata for your data model:
GET 'http://server:8080/rest/entities/Speaker'
A single endpoint at /rest/entities can handle requests for entity manipulations. The application “knows” which entities should be selected if a user sends the GET request for an entity (Speaker in our example). Moreover, it costs nothing for an application to provide a Swagger-compatible endpoints schema because we have all the metadata we need.
Jmix can generate a swagger doc that includes all entities and attributes that a developer can process via REST API, and make it available by a specific URL:
GET 'http://server:8080/rest/docs/swagger.json'
For example, a list of endpoints for CRUD operations looks like this:

The good thing is that with Jmix you don’t need to do the boring job of implementing these endpoints manually. Thanks to the metamodel, everything can be generated for you, and it can be a good starting point to build your own specific REST API using the “back-for-the-front” approach.
If you need something more flexible than generic CRUD REST API, you can use GraphQL. One of the key concepts in GraphQL is its schema. With Jmix’s metamodel, we have all the data for the GraphQL schema without extra efforts.
It means that GraphQL API for Jmix applications can be implemented (and it is going to be released soon) in a generic way, similar to the REST API. So, adding a GraphQL endpoint to your Jmix application will be as simple as adding one more starter to the build script.
implementation 'io.jmix.graphql:jmix-graphql-starter'
After that, you are able to create queries similar to this:
{
  speakerCount
  speakerList(limit: 10, offset: 0, orderBy: {name: ASC}) {
    id
    name
    email
  }
}
Conclusion
Just by defining the data model in Jmix, mostly using familiar JPA annotations, you’re getting a ready-to-use application. Thanks to Jmix’s metamodel, you can use the following features almost without extra coding:
- Row-level security
- Soft delete
- CRUD REST API
- GraphQL API
As you see, creating a simple data-centric application with advanced features and admin UI is going to be near trivial with Jmix.