Working with Images in CUBA applications
There are several ways to interact with images in a CUBA application. In this guide, we’ll demonstrate how to upload and display images in the application on live examples. You’ll also learn how to attach those images to entities and how to enable users to download the image files from the application.
What we are going to build
This guide enhances the CUBA Petclinic example to allow users to attach images to entities and interact with them. In particular, we’ll make the following:
-
ability to upload an avatar image for a Veterinarian
-
render the Veterinarian’s avatar in the Veterinarian’s browse table
-
create custom lookup-like component that shows the Veterinarian’s avatar next to the name
-
ability to attach X-Ray images to a visit and preview the images
Requirements
Your development environment requires to contain the following:
-
CUBA Studio as standalone IDE or as an IntelliJ IDEA plugin
Download and unzip the source repository for this guide, or clone it using git:
Example: CUBA petclinic
The project that is the basis for this example is CUBA Petclinic. It is based on the commonly known Spring Petclinic. The CUBA Petclinic application deals with the domain of a Pet clinic and the associated business workflows to manage a pet clinic.
The underlying domain model for the application looks like this:
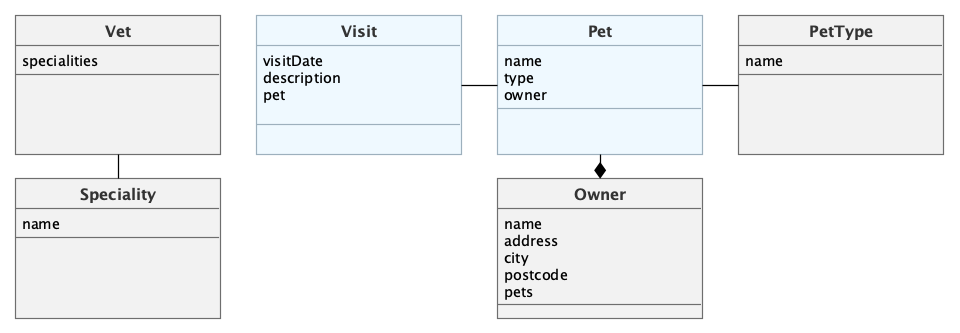
The main entities are Pet and Visit. A Pet is visiting the petclinic and during this Visit a Vet is taking care of it. A Pet belongs to an Owner, which can hold multiple pets. The visit describes the act of a pet visiting the clinic with the help of its owner.

CUBA’s File Storage Subsystem
CUBA has a comprehensive set of features for interacting with files within an application. The underlying subsystem is called File Storage.
This set of APIs allow the developer to fulfill the end-to-end process of working with files. This mainly contains:
-
ability for users to upload files
-
store references from business entities in files
-
read & write files in the application
-
ability for users to download files
The File Storage subsystem separates the storage of the file metadata from the file binary. It stores metadata about the file in the relational database and the raw file binary in the filesystem.
Find more information about this topic in the reference documentation on File Storage.
As an Image is just a particular type of file, you can handle the image just like any other kind of file, with some specific additional behavior like preview in the browser.
Veterinarian’s Avatar Image
The first example of this Images guide allows users to upload & display an avatar image for a particular veterinarian.
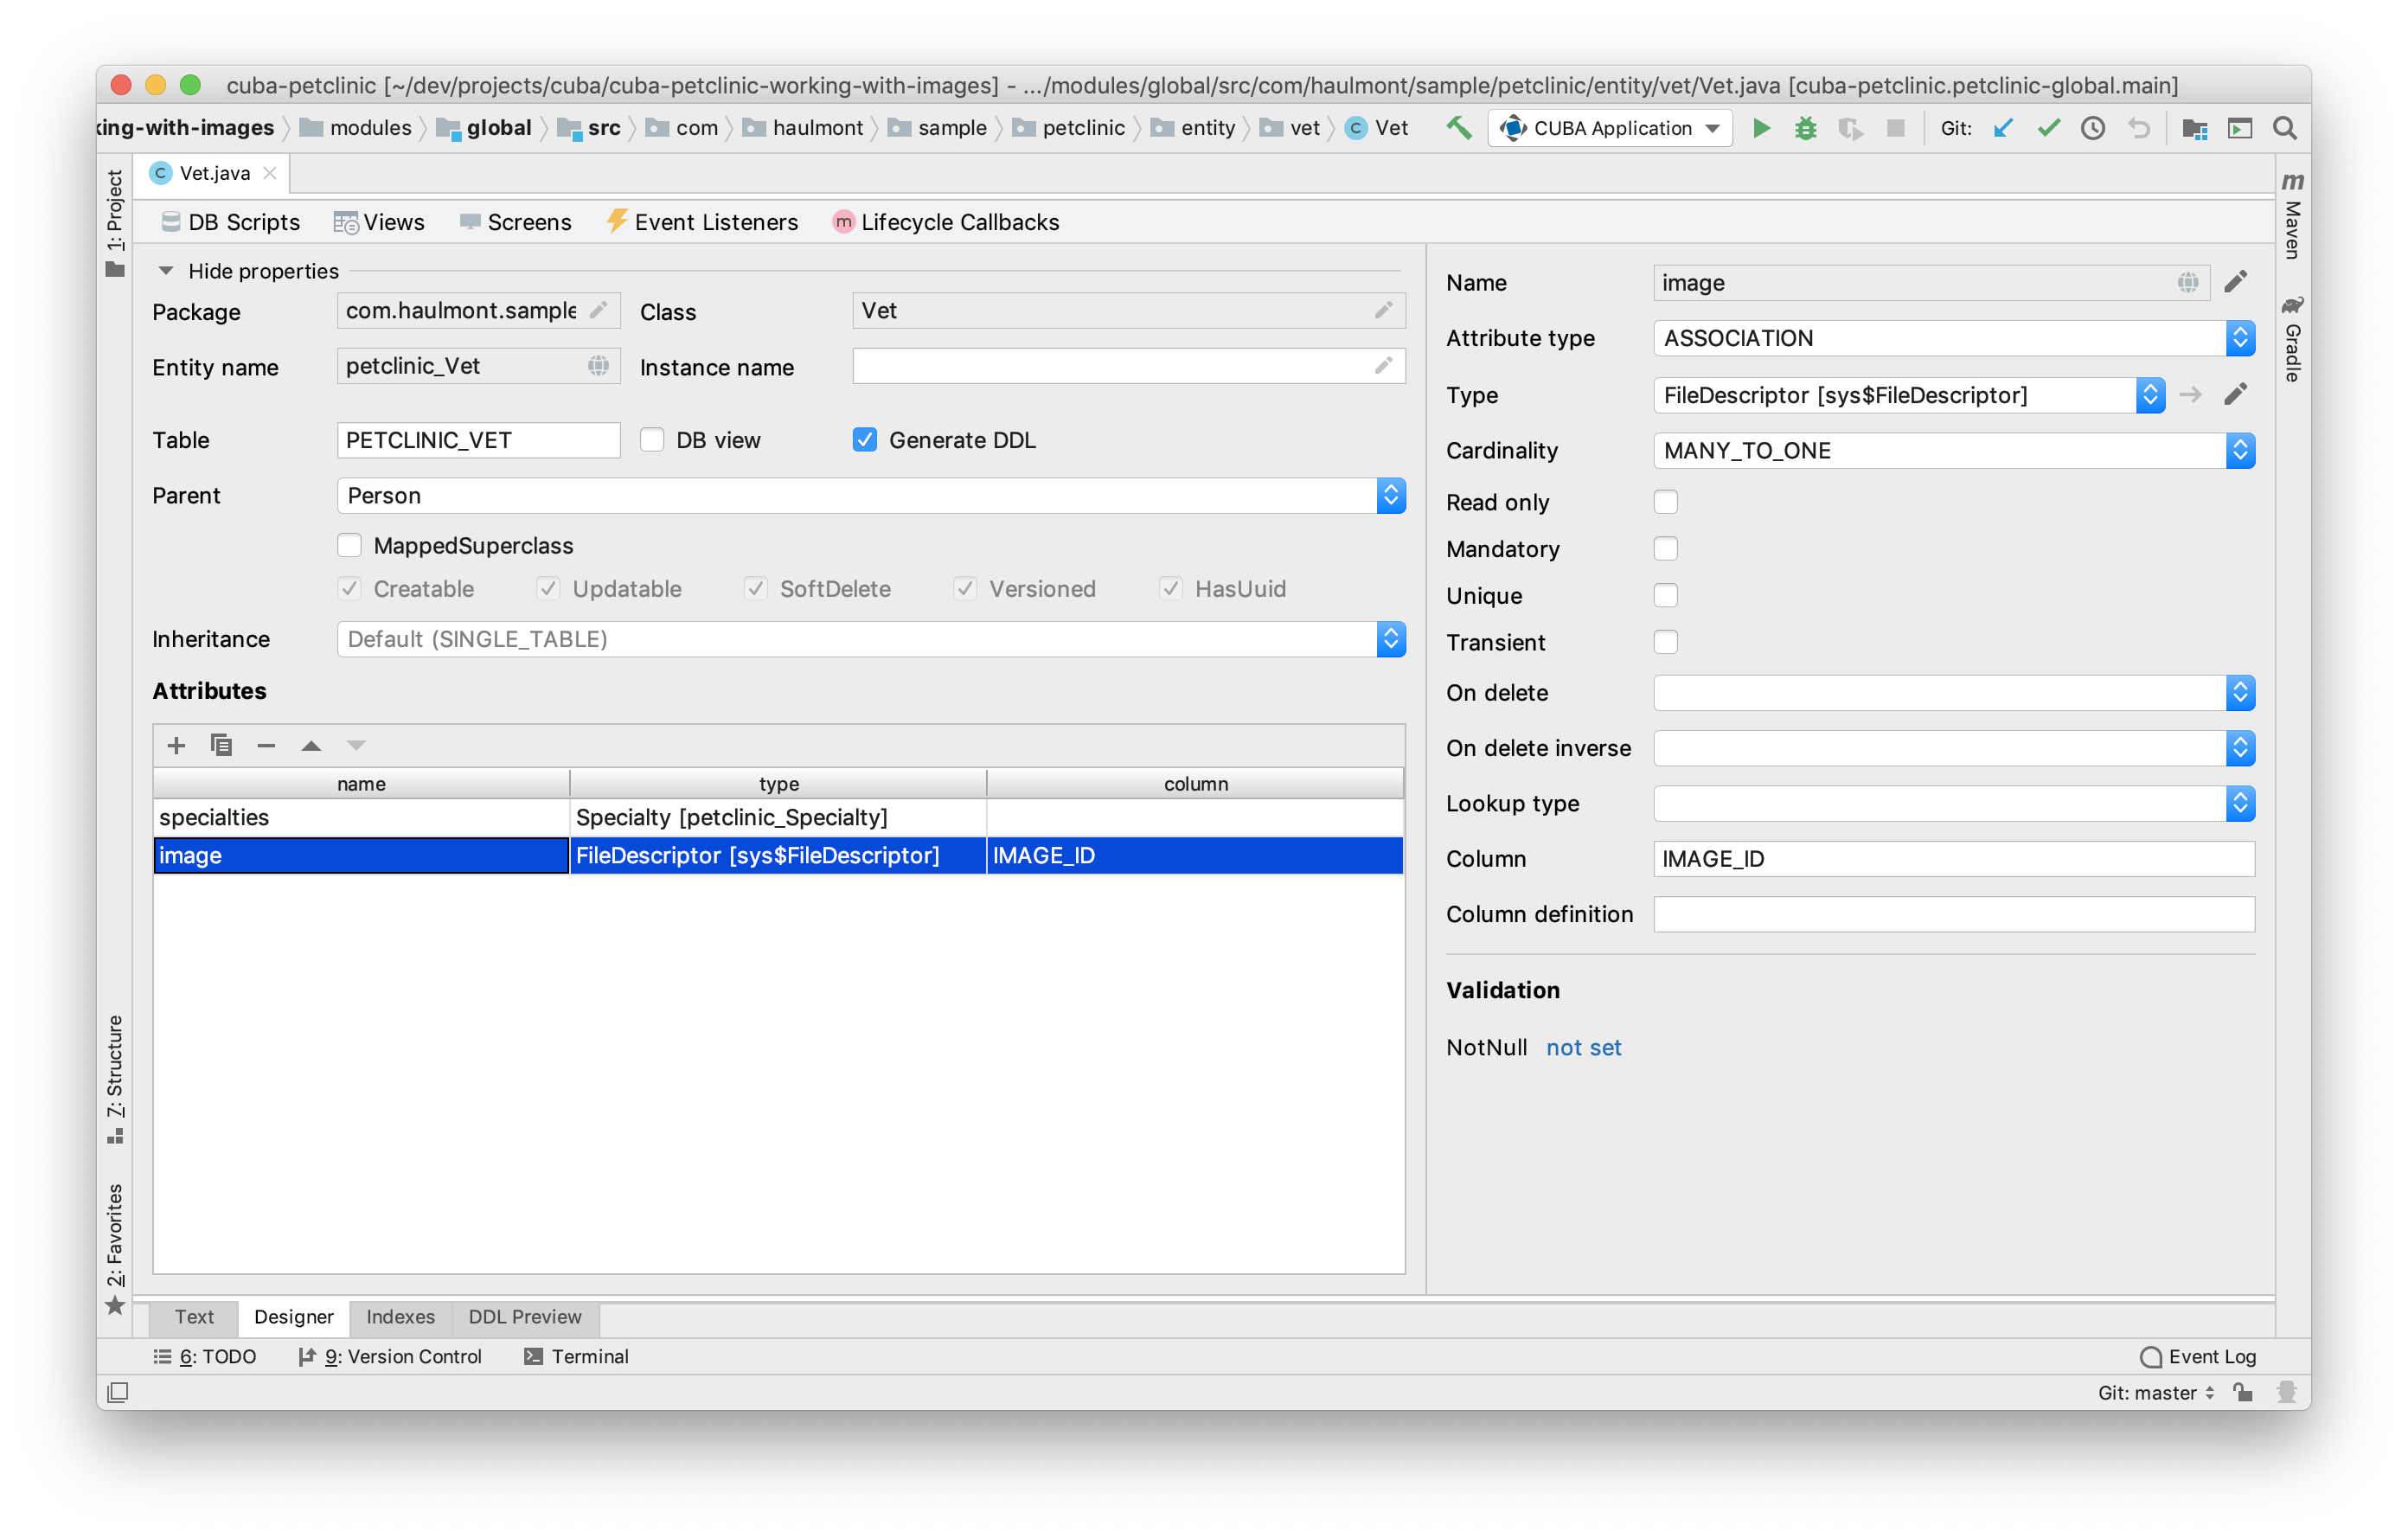
To achieve this behavior, we need to enhance the data model of the Petclinic to store a reference to a file for the Vet entity. The corresponding JPA entity bundled in CUBA itself is called FileDescriptor. It represents the metadata part of a file and acts as a pointer to this file.
The association type is MANY-TO-ONE. In the Studio entity designer, the result looks like this:
Since the entity model contains the reference to the FileDescriptor entity, we need to add the image attribute to the view to interact with this attribute in the UI.
Change the view vet-with-specialties for the Vet entity that is used within the Vet editor, so that it will contain the image attribute like this:
<view class="com.haulmont.sample.petclinic.entity.vet.Vet"
      extends="_local"
      name="vet-with-specialties-and-image">
    <property name="specialties"
              view="_minimal"/>
    <property name="image" view="_base" />
</view>
With this adjustment it’ll be better to rename the view name to vet-with-specialties-and-image to reflect the content of the view.
Upload Vet’s Avatar Image
With those preconditions in place, the next step is to adjust the Vet editor, so that you can upload an image during the process of creating / editing a Vet record.
CUBA has a built-in UI component for dealing with FileDescriptor instances - the FileUploadField component. We’ll add this component to the existing <form /> component in the vet-edit.xml screen descriptor:
<form id="fieldGroup" dataContainer="vetDc">
    <column width="250px">

        <textField property="firstName"/>
        <textField property="lastName"/>

        <upload id="imageField"
                property="image" (1)
                fileStoragePutMode="IMMEDIATE"
                showFileName="true"
        />

    </column>
</form>| 1 | the FileUploadField component binds the uploaded file to the image attribute of the vetDc data container |
There are a couple of options for controlling the behavior of the upload component, you can find them in the reference documentation. For this use case, the default behavior is sufficient. It will allow users to upload, download, remove and re-upload a file and directly attach it to the vet instance of the editor.
The resulting user interface looks like this:
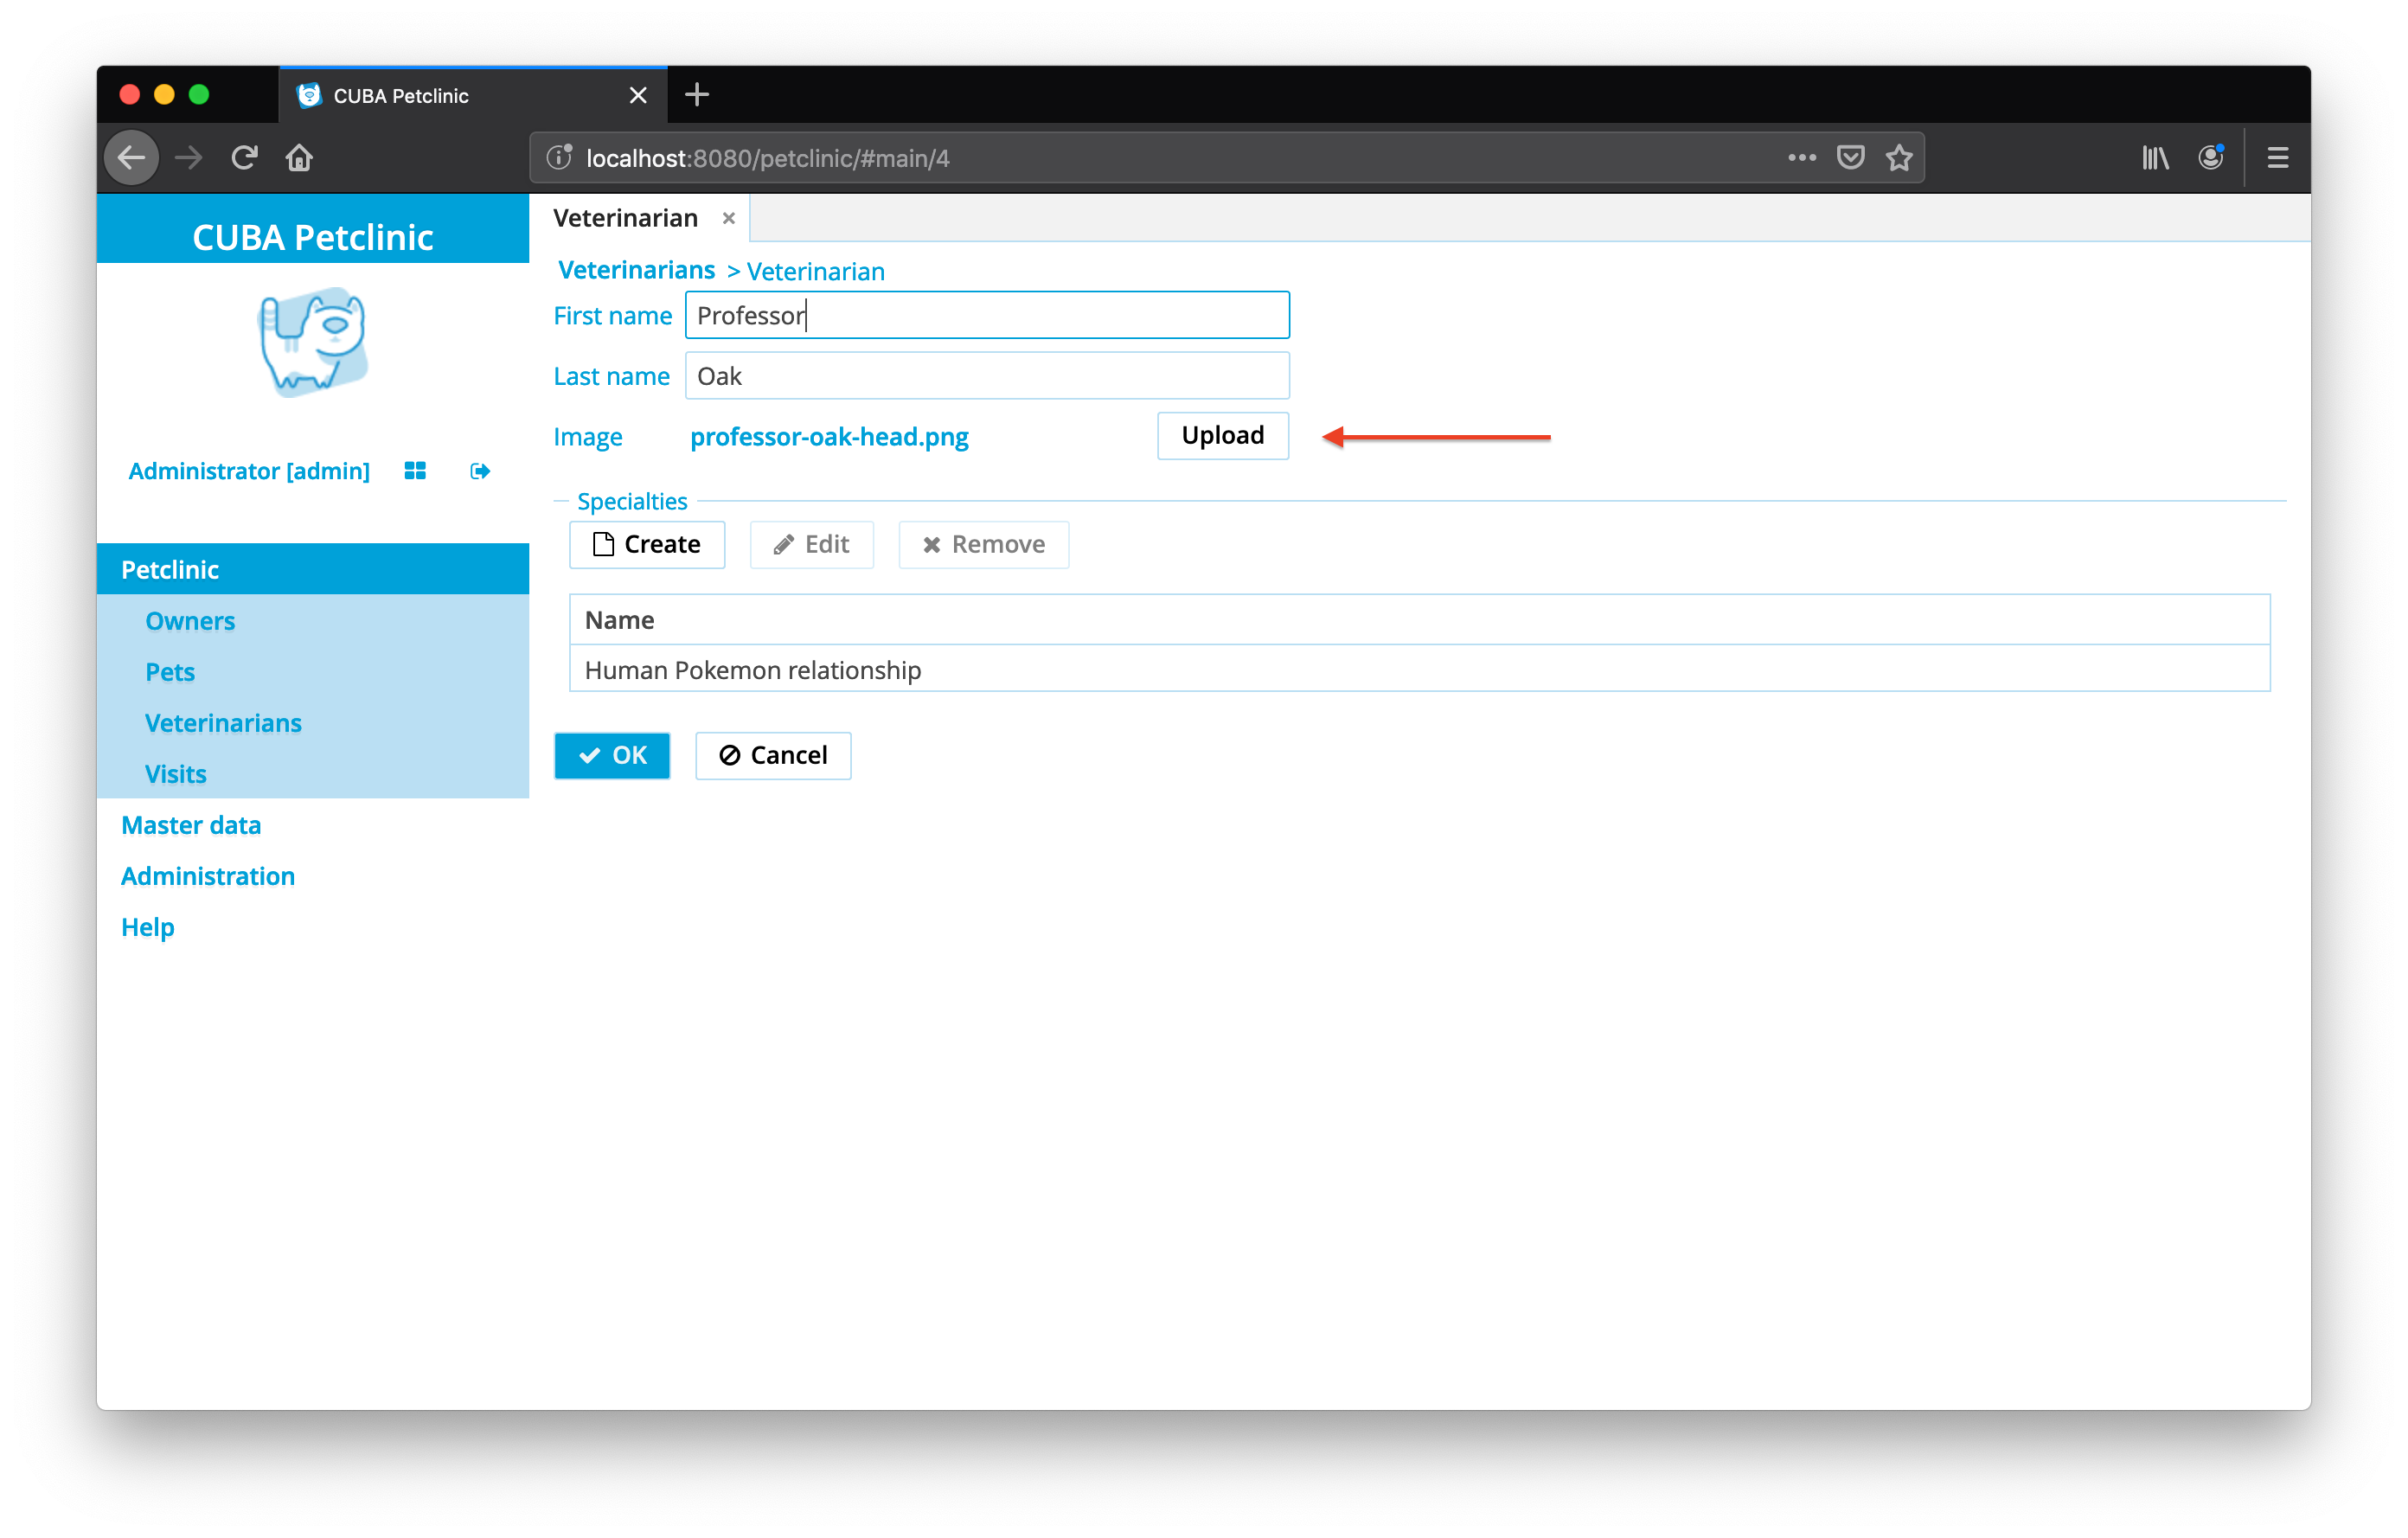
When the fileStoragePutMode attribute is set to IMMEDIATE, the file is persisted and a corresponding persisted FileDescriptor instance is created directly after the file uploading is completed. The benefit of such approach is that it is possible to link the Vet instance to the image without further programmatic interaction.
However, it has the side effect: even if the vet instance is not saved, the file will be kept in the system. It can still be found via Administration > External Files. If you want to change such behavior, set the fileStoragePutMode to MANUAL, which requires manual management of the file persistence. The next use case will describe this behavior in detail.
Display Vet’s Avatar Image in the Browse Table
The next example of dealing with the Vet’s avatar image is displaying it in the Vet browse screen. To do that, the image attribute has to be a part of the corresponding view (which it is from the change above).
To display an image in a screen the second UI component in this space is the <image /> component. It allows rendering an image based on various sources including:
-
Image from the filesystem / classpath
-
Image from an arbitrary URL
-
Image from a
FileDescriptorinstance
See CUBA docs: Image UI component for more information on the possible options.
In this use case, since the Vet instance holds the reference to a FileDescriptor instance via the image attribute, you can directly render the image out of the file reference.
The target UI should look like this:
The image attribute should be a column in the vets table. Furthermore, it should render a particular representation of the image: not the instance name of the FileDescriptor, but the image itself.
We need to provide some programmatic definition in the controller to achieve this behavior.
The Table component has a particular API method: addGeneratedColumn, which allows defining a Component as a representation for a particular column in the table. This method is called for every entity to be displayed in the table, and it receives the corresponding entity instance as a parameter.
public class VetBrowse extends StandardLookup<Vet> {

    @Inject
    protected GroupTable<Vet> vetsTable;

    @Inject
    protected UiComponents uiComponents;

    @Subscribe
    protected void onInit(InitEvent event) {
        vetsTable.addGeneratedColumn( (1)
                "image",
                this::renderAvatarImageComponent
        );
    }

    private Component renderAvatarImageComponent(Vet vet) {
        FileDescriptor imageFile = vet.getImage(); (2)
        if (imageFile == null) {
            return null;
        }
        Image image = smallAvatarImage();
        image.setSource(FileDescriptorResource.class)
                .setFileDescriptor(imageFile); (4)

        return image;
    }

    private Image smallAvatarImage() {
        Image image = uiComponents.create(Image.class);  (3)
        image.setScaleMode(Image.ScaleMode.CONTAIN);
        image.setHeight("40");
        image.setWidth("40");
        image.setStyleName("avatar-icon-small");
        return image;
    }
}| 1 | a new column image is registered in the vetsTable through the renderAvatarImageComponent method |
| 2 | the FileDescriptor reference is retrieved from the Vet instance through the image association |
| 3 | the UI infrastructure bean uiComponents is the entry point for creating UI components programmatically |
| 4 | the Image component is bound to the FileDescriptor through the FileDescriptorResource variant |
With this code in place, an image component is created, configured and bound to the FileDescriptor instance. With the corresponding style name avatar-icon-small, the image is rendered as shown above.
Create Vets Lookup Component containing the Avatar Image
The last part of the Vet avatar functionality is the representation of the Vet in the Visit detail screen with the image and the name shown like this:
This requires to apply the image component in a different way as this component is now a part of the Visit editor inside the <form /> component.
The source code for providing this functionality consists of two parts:
-
the
VetEditcontroller which orchestrates the creation and binding of the custom component -
the
VetPreviewComponentFactorywhich is responsible for creating the component shown above with the correct layout and binding to the correct fields of theInstanceContainer
|
A dedicated factory class defining how the component is created is just one possible option to structure the implementation. It has certain advantages to extract the creating of the component into a dedicated class like encapsulation, separation of concerns and the ability to re-use in other screens. However, you can also include the component creation logic directly into the controller. You can see this variant as an example on how to structure business logic in the UI layer. Find more information about this topic in the Create business logic in CUBA guide. |
The orchestration within the VetEdit controller looks like this:
public class VisitEdit extends StandardEditor<Visit> {

    @Inject
    protected Form treatingVetForm;

    @Inject
    protected InstanceContainer<Visit> visitDc;

    // ...

    @Subscribe
    protected void renderTreatingVetLayout(AfterShowEvent event) {

        VetPreviewComponentFactory vetPreviewComponentFactory =
            new VetPreviewComponentFactory( (1)
                uiComponents,
                screenBuilders,
                this
            );

        Component vetPreview = vetPreviewComponentFactory.create(  (2)
                visitDc,
                vet -> getEditedEntity().setTreatingVet(vet)
        );

        treatingVetForm.add(vetPreview); (3)
    }
}| 1 | a new VetPreviewComponentFactory instance is created with all the required dependencies passed to it |
| 2 | create creates an instance of the desired Vet avatar image component |
| 3 | the created component is attached to the treatingVetForm to render the vet avatar image |
The VetPreviewComponentFactory code has some more code for the correct positioning of the elements within the layout. The key points are listed below (the complete class can be found in the example project: VetPreviewComponentFactory.java).
public class VetPreviewComponentFactory {

    private final UiComponents uiComponents;
    private final ScreenBuilders screenBuilders;
    private final FrameOwner frameOwner;

    public Component create( (1)
            InstanceContainer<Visit> visitDc,
            Consumer<Vet> vetSelectionHandler
    ){
        return verticalLayout(
                vetImage(visitDc),
                horizontalLayout(
                        treatingVetName(visitDc),
                        editVetButton(vetSelectionHandler)
                )
        );
    }

    // ...

    private Image vetImage(InstanceContainer<Visit> visitDc) {

        Image image = uiComponents.create(Image.class);
        // ...
        image.setValueSource(
                new ContainerValueSource<>(visitDc, "treatingVet.image") (2)
        );
        return image;
    }

    private Button editVetButton(Consumer<Vet> vetSelectionHandler) {

        LinkButton button = uiComponents.create(LinkButton.class);
        // ...
        button.setAction(
                new BaseAction("changeVet")
                .withHandler(event -> openVetLookup(event, vetSelectionHandler)) (3)
        );
        return button;
    }

    private void openVetLookup(
            Action.ActionPerformedEvent event,
            Consumer<Vet> vetSelectionHandler
    ) {
        screenBuilders.lookup(Vet.class, frameOwner)
                .withOpenMode(OpenMode.DIALOG)
                .withSelectHandler(
                        vets -> vetSelectionHandler.accept(vets.iterator().next())
                )
                .show();
    }
}| 1 | a vertical layout containing the image, a horizontal layout containing the name and an "Edit" button is created |
| 2 | the ValueSource references the image attribute of the associated treatingVet for the data container |
| 3 | the handler for the "Edit" button triggers the provided vetSelectionHandler, so the associated actions can be controlled from the outside of this factory method |
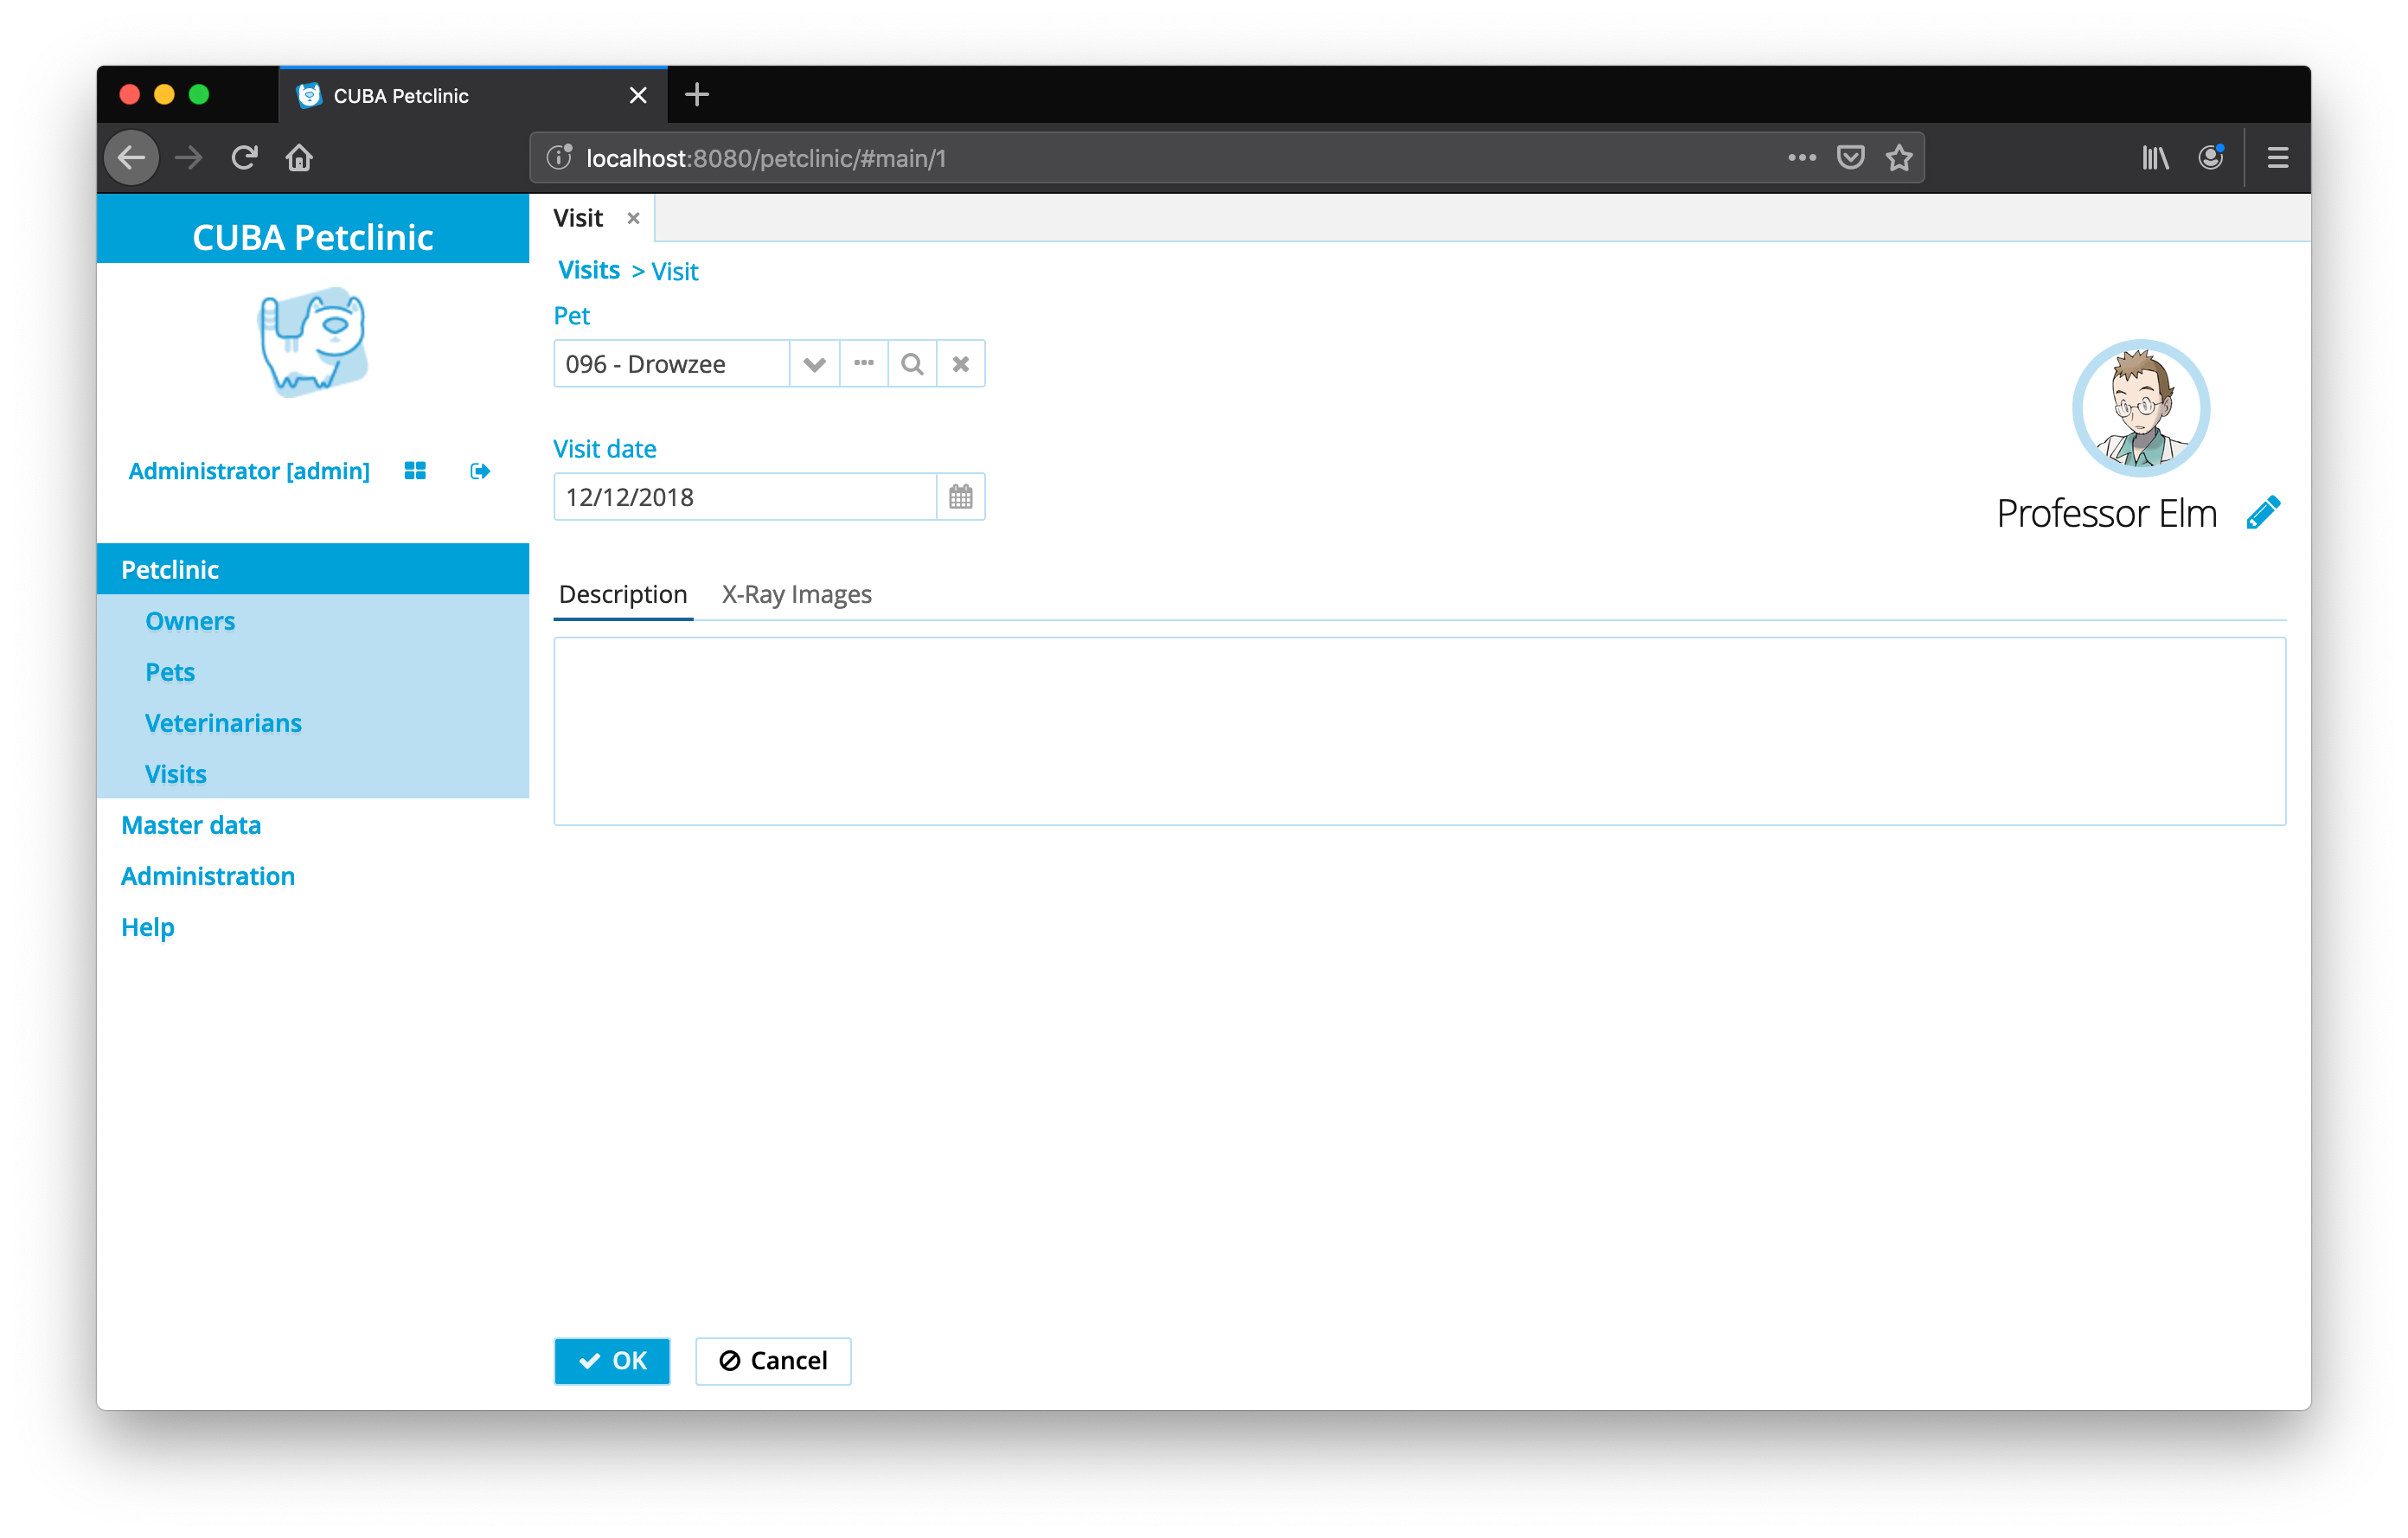
With this, the final usage of the custom Vet display & selection for the Vet looks like this:
X-Ray Images for Visits
The second use case that we’ll describe in this guide is the ability to attach X-Ray images to a particular visit. Those X-Ray images should be displayed when selected in the Table. Further we’ll add the possibility to upload and download those images.
As a precondition we must make another change in the data model. As before, for the Vet entity the Visit also needs a reference to the FileDescriptor, but this time it is a MANY-TO-MANY association. Having made this domain model change and the corresponding view adjustment, we can tackle the three parts of uploading, previewing and downloading the X-Ray images.
Upload X-Ray Images
The first step is to upload the X-Ray image to a particular Visit instance. For this we need to place the following <upload /> component in the <buttonsPanel /> component of the xRayImagesTable. Compared to the first use case, this time it’s better to set the fileStoragePutMode to MANUAL. It gives more freedom in defining the persistence behavior required in this scenario.
<upload id="upload"
        showClearButton="false"
        uploadButtonIcon="UPLOAD"
        uploadButtonCaption=""
        fileStoragePutMode="MANUAL" (1)
        permittedExtensions=".png,.jpg,.pdf" (2)
        dropZone="contentHBox" (3)
showFileName="false"/>| 1 | the controller will handle the persistence operation manually to display the image preview correctly |
| 2 | either images or PDF files might be uploaded |
| 3 | the additional drop zone allows users to drag & drop files onto the table / preview component |
The corresponding VisitEdit controller subscribes to the FileUploadSucceedEvent of the upload component, persists the file and adds the FileDescriptor to the M:N association of the visit instance.
public class VisitEdit extends StandardEditor<Visit> {

    @Inject
    protected CollectionPropertyContainer<FileDescriptor> xRayImagesDc;

    @Inject
    protected FileUploadField upload;

    @Inject
    protected DataContext dataContext;

    @Inject
    protected FileUploadingAPI fileUploadingAPI;

    @Subscribe("upload")
    protected void onUploadFileUploadSucceed(
            FileUploadField.FileUploadSucceedEvent event
    ) {
        FileDescriptor imageDescriptor = upload.getFileDescriptor(); (1)

        try {
            fileUploadingAPI.putFileIntoStorage(upload.getFileId(), imageDescriptor); (2)

            FileDescriptor savedImageDescriptor = dataManager.commit(imageDescriptor);
            newImageDescriptors.add(savedImageDescriptor);

            xRayImagesDc.getMutableItems().add(savedImageDescriptor); (3)
            /* ... */
        } catch (FileStorageException e) {
            /* ... */
        }
    }
}| 1 | the newly created FileDescriptor instance of the uploaded file is necessary to persist the instance |
| 2 | the uploaded file is transferred to the backend and persisted in the FileStorage |
| 3 | the FileDescriptor instance for the persisted file is assigned to the X-Ray images M:N association to display it in the table |
| Besides the code in the listing, there is a little bit more relevant code in the example. It handles the case when the user cancels the edit operation of the visit after uploading an image. In this case the images have to be removed again. For more information see the example: VisitEdit.java. |
With that subscription code, the X-Ray image upload is implemented and can be used to enable the preview of the uploaded images.
X-Ray Image Preview
To render the uploaded X-Ray image preview, we need to adjust the visit-edit.xml so that it can display information next to the X-Ray images M:N table.
<hbox id="contentHBox" spacing="true" width="100%">
    <table id="xRayImagesTable"
           dataContainer="xRayImagesDc"
           width="100%"
           height="100%"
           columnControlVisible="false">
        <actions>
            <action id="download" trackSelection="true" icon="DOWNLOAD"/>
            <action id="edit" type="edit"/>
            <action id="remove" type="remove"/>
        </actions>
        <columns>
            <column id="name"/>
        </columns>
    </table>
    <hbox id="xrayImageWrapperLayout"
          height="100%"
          width="100%"
          spacing="true">
    </hbox>
</hbox>
The most relevant part for this case is the xrayImageWrapperLayout component, which acts as a placeholder that will contain the image later. Currently it contains no child components, instead it will be dynamically filled when a selection is made for the xRayImagesTable.
public class VisitEdit extends StandardEditor<Visit> {

    @Inject
    protected Table<FileDescriptor> xRayImagesTable;

    @Subscribe("xRayImagesTable")
    protected void onXRayImagesTableSelection(
            Table.SelectionEvent<FileDescriptor> event
    ) {
        xrayImageWrapperLayout.removeAll();
        Set<FileDescriptor> selectedXrayImages = event.getSelected(); (1)
        if (!selectedXrayImages.isEmpty()) {
            xrayImageWrapperLayout.add( (2)
                    xrayImage(
                            selectedXrayImages.iterator().next()
                    )
            );
        }
    }

    private Component xrayImage(FileDescriptor file) {
        XrayPreviewComponentFactory factory = new XrayPreviewComponentFactory(
                uiComponents,
                messageBundle
        );

        return factory.create(file); (3)
    }
}| 1 | the table selection event is used to fetch the selected FileDescriptor instance (X-Ray image) |
| 2 | an X-Ray component is placed within the xrayImageWrapperLayout as a child component for the selected X-Ray image |
| 3 | the logic to create the X-Ray image preview component is delegated to the XrayPreviewComponentFactory class |
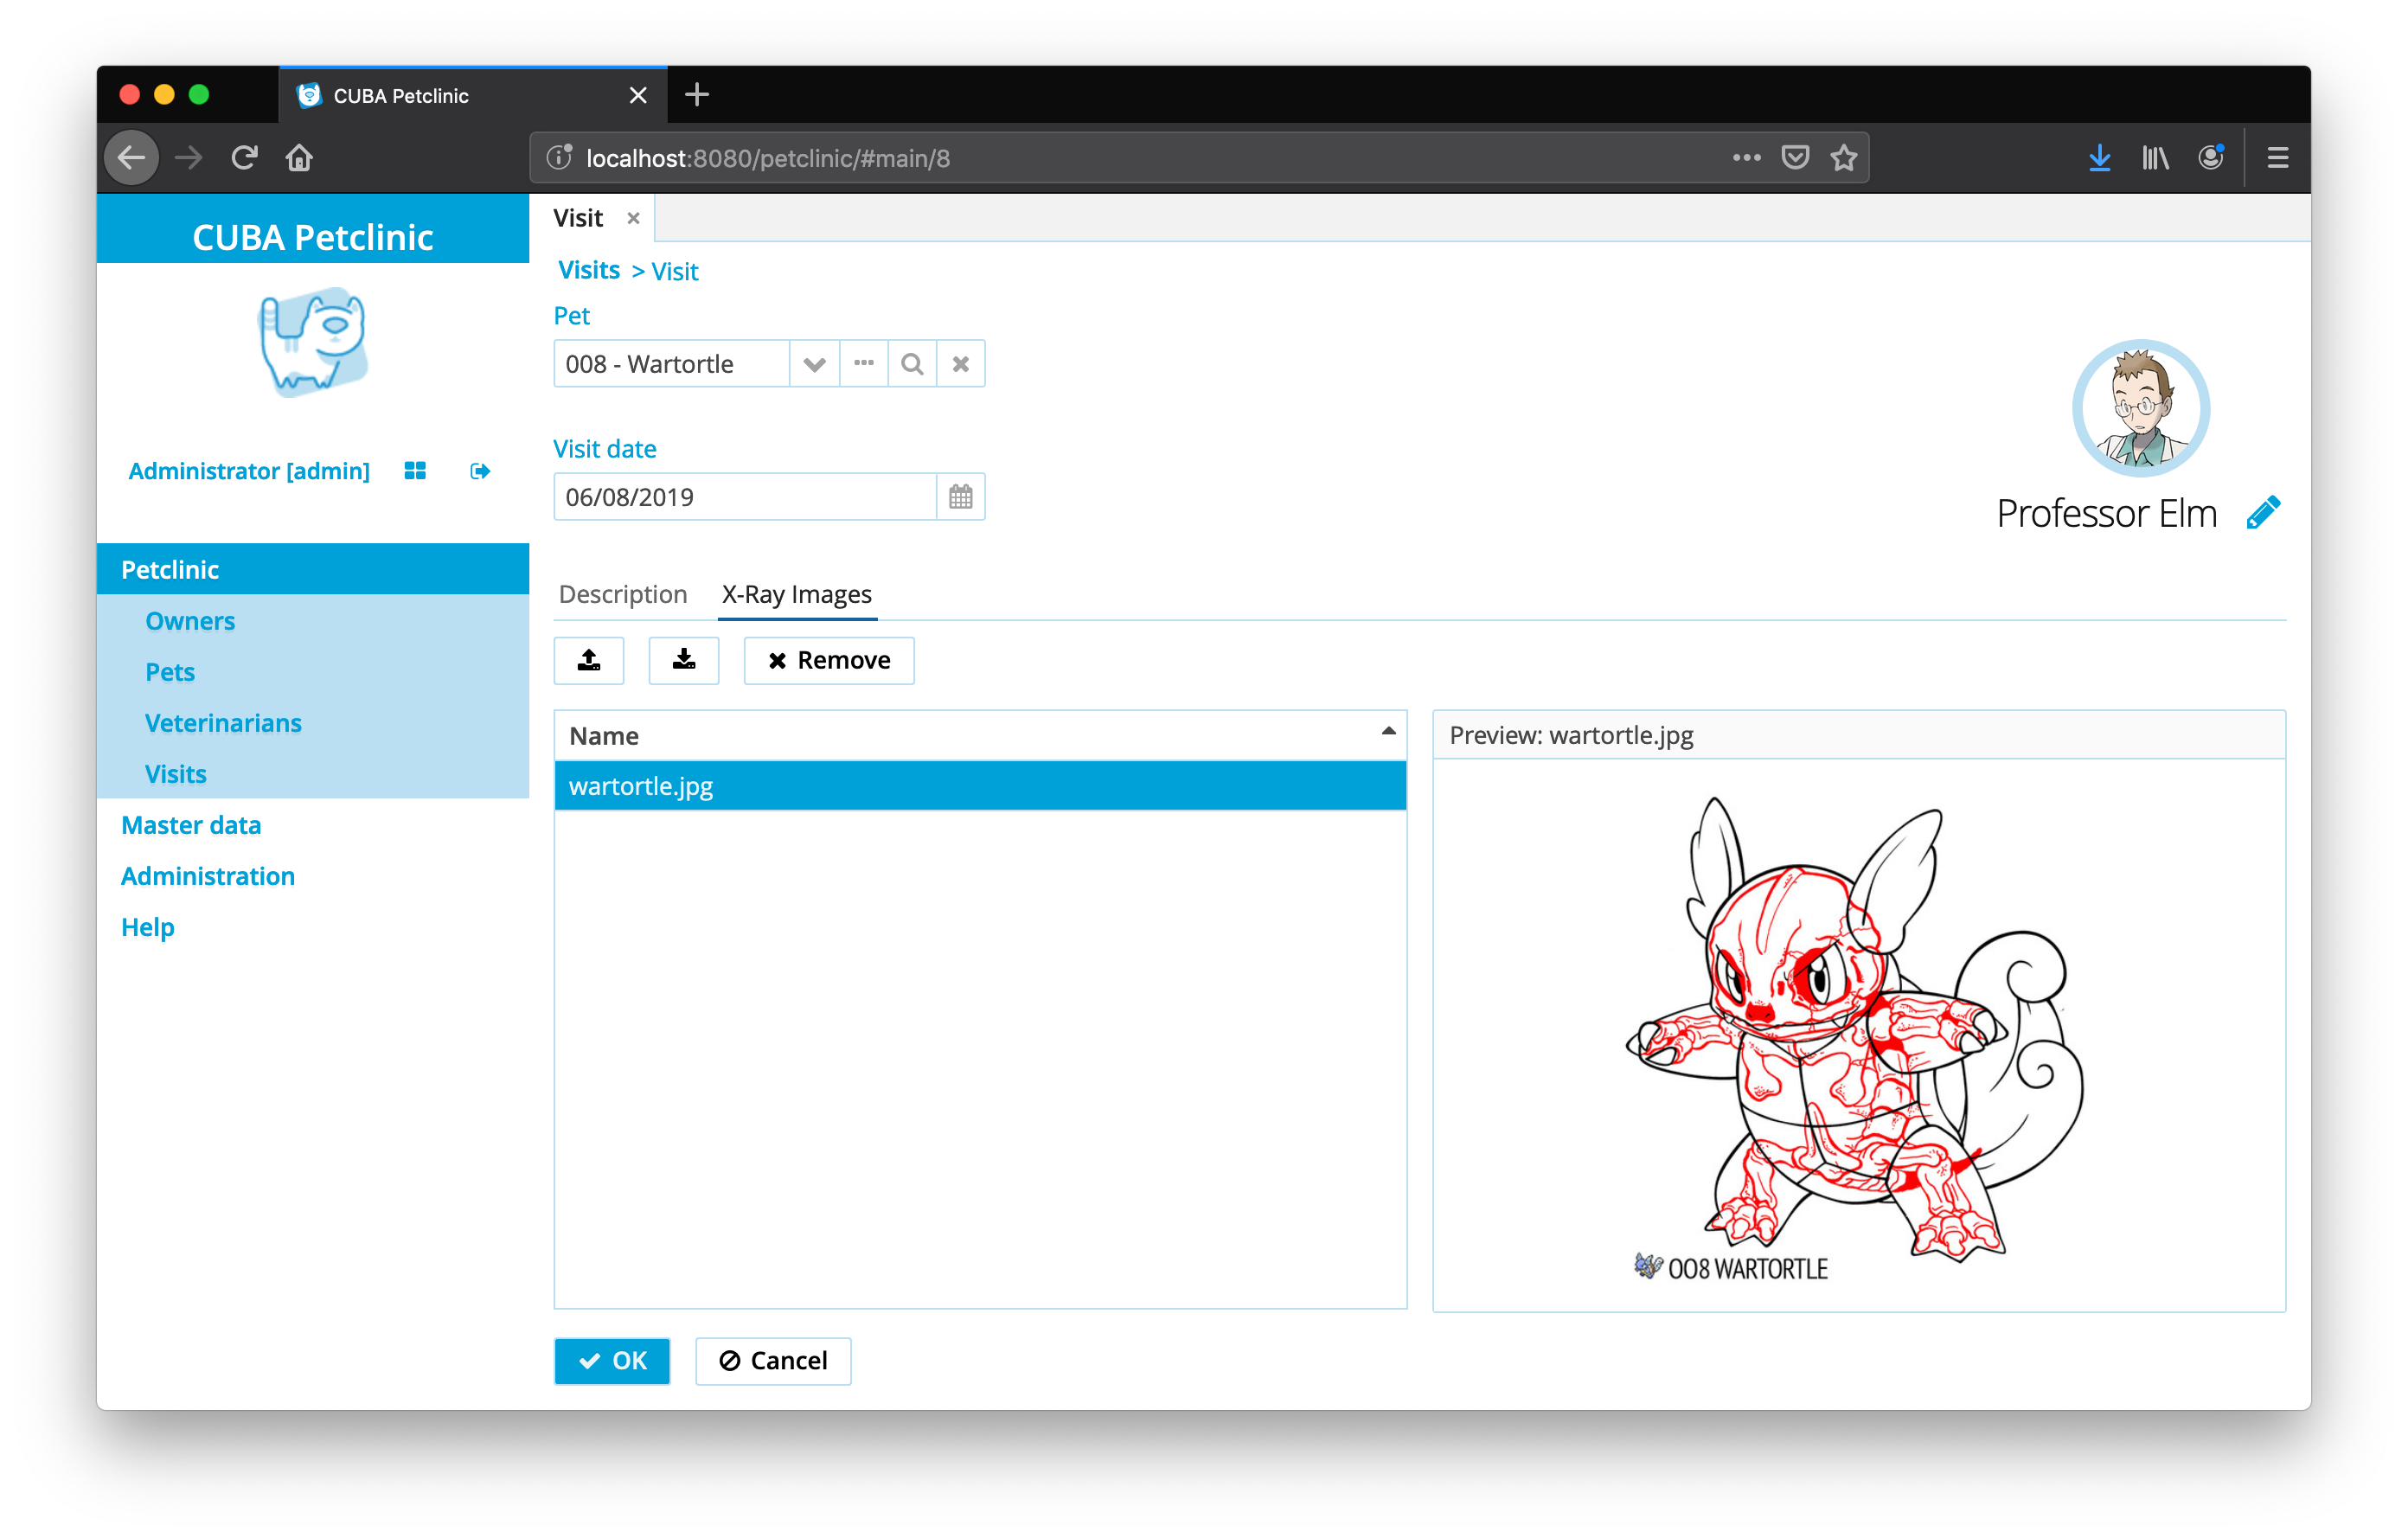
Since the X-Ray image preview is also a composition of multiple elements, this logic was once again extracted into a dedicated Factory class. The resulting UI layout consists of a GroupBox which has the filename as the caption and the image preview as the content:
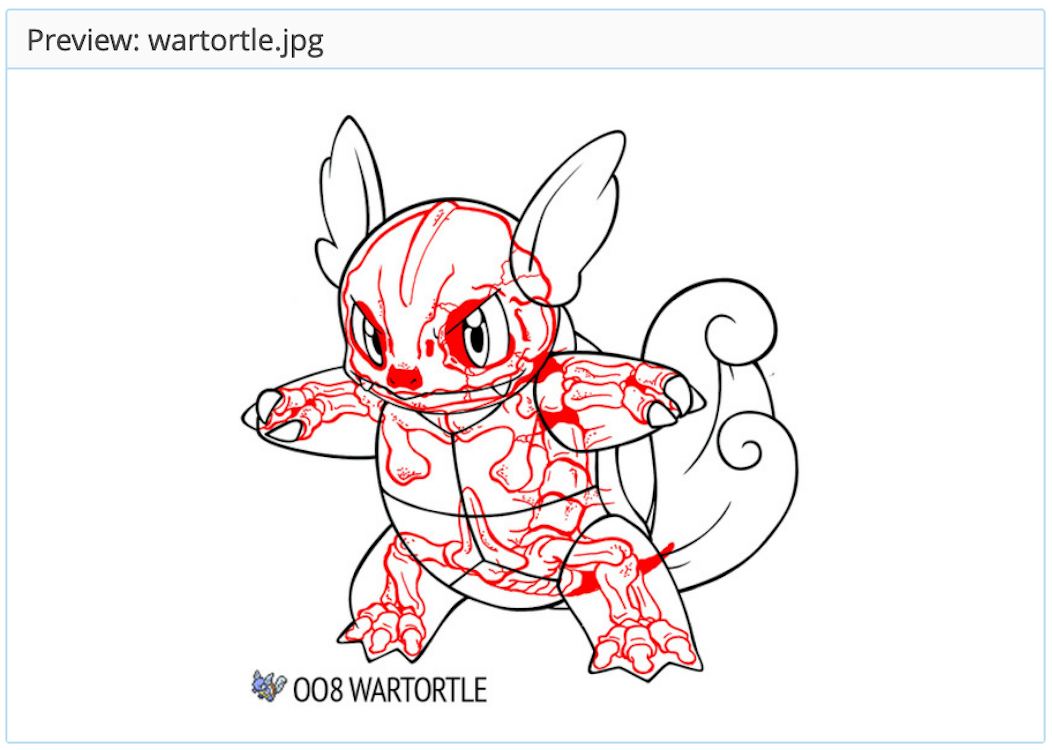
The listing for the XrayPreviewComponentFactory contains only the most relevant parts. The first one is the ability to render either Images or PDF files directly in the browser. This requires a branching logic within the implementation to use the correct UI component based on the file type.
public class XrayPreviewComponentFactory {

    public Component create(FileDescriptor file) {
        GroupBoxLayout groupBoxLayout = uiComponents.create(GroupBoxLayout.class);
        groupBoxLayout.setShowAsPanel(true); (1)
        groupBoxLayout.setStyleName("well");
        groupBoxLayout.setCaption(
                messageBundle.formatMessage("previewFile", file.getName())
        );
        if (isPdf(file)) {
            groupBoxLayout.add(xrayPdfComponent(file));
        }
        else if (isImage(file)){
            groupBoxLayout.add(xrayImageComponent(file));
        }
        return groupBoxLayout;
    }

    private boolean isPdf(FileDescriptor file) {
        return file.getExtension().contains("pdf");
    }

    // ...

    private Component xrayImageComponent(FileDescriptor imageFile) {
        Image image = uiComponents.create(Image.class);
        image.setScaleMode(Image.ScaleMode.SCALE_DOWN);
        image.setSource(FileDescriptorResource.class)
                .setFileDescriptor(imageFile); (2)
        return image;
    }

    private Component xrayPdfComponent(FileDescriptor imageFile) {
        BrowserFrame browserFrame = uiComponents.create(BrowserFrame.class);
        browserFrame.setSource(FileDescriptorResource.class)
                .setFileDescriptor(imageFile)
                .setMimeType(MediaType.APPLICATION_PDF_VALUE); (3)
        return browserFrame;
    }
}| 1 | GroupBox specific styles will be applied to the wrapper component |
| 2 | in case of an image, the Image component will be used and the FileDescriptor will be assigned as a source |
| 3 | in case of a PDF file, the correct mime type must be set to render the file in the browser inline |
With those two parts in place, the preview functionality of the X-Ray Images is complete:
Download X-Ray Images
The last part of the X-Ray Image preview functionality is the possibility to download the image files.
For this we will make an additional download button and action on top of the xRayImagesTable. The controller code uses the ExportDisplay bean from CUBA to trigger the download of a FileDescriptor in the browser.
public class VisitEdit extends StandardEditor<Visit> {

    @Inject
    protected ExportDisplay exportDisplay;

    @Subscribe("xRayImagesTable.download")
    protected void onXRayImagesTableDownload(Action.ActionPerformedEvent event) {
        downloadFile(xRayImagesTable.getSingleSelected());
    }

    private void downloadFile(FileDescriptor file) {
        exportDisplay.show(file, ExportFormat.OCTET_STREAM);
    }
}
The exportDisplay bean has multiple options to download a file. The one we’ll use takes a FileDescriptor instance. ExportFormat.OCTET_STREAM indicates that the browser should force the file download instead of rendering it within the browser.
Summary
Image rendering within CUBA applications as well as custom composition of components will enrich the CRUD experience for users immediately. The main building block is the FileDescriptor abstraction that all UI components seamlessly integrate with.
In this guide we showed two use cases. The first one with the Vet avatar image used the standard upload functionality within a <form /> component and rendered the result as a generated column within a table. Additionally we created a custom image-aware "PickerField". The second use case used the APIs more directly to upload, preview and download X-Ray images for visits.


